Friday, August 31, 2012

Picky Eaters


Our sunflower harvest this year was pretty plentiful thanks to the Mammoth Sunflowers we grew.  The girls have been picking the seeds out of the dried heads and filling very large ziploc bags with them for roasting once cooler temps arrive.

After reading several blogs and articles on how much chickens LOVE whole sunflower seeds and how good they are for them.  Hannah and I headed out to give the "girls and one guy" a treat.  Or so we thought.

We began pulling out some seeds from the flower head and sprinkling them on the ground.  The initial scurrying about and excitement quickly died down to a bunch of funny looks from disappointed chickens.

Hannah's "little hand" did an amazing job of pulling these seeds out so much faster than I could

The rooster after pecking at a few made some funny sounds and the girls moved off to the bushes as though they needed to be leary of us!   Needless to say the seeds were not the hit I thought they would be after all I'd read about what a "treat" these were for chickens.  Either mine are too lazy to work at eating them or as the title states they are just picky eaters.


Oh well, the birds and squirrels that are always foraging in their area will probably enjoy them.  The pieces of overly ripe pears and apples I took out later were a much bigger hit.


You might note that the rooster has been relegated to a caged area.  Our overly amorous guy was just doing too much damage to the backs of the girls.  We had hoped that when we expanded the chickens area a few months ago they might get a break not being in such close quarters and able to flee.  Didn't happen and since a few were beginning to look like they'd already been plucked in preparation for cooking we figured we needed to do something about our Don Jaun who can't seem to keep his libido in check.  So seperation was the only answer. 

Note the bald head and back

It's been a couple weeks and some of the feathers are beginning to come back.  Need to get them full again before temperatures change.  It's bad enough that they have sunburns for lack of plummage!!  So note to self " sunflower seeds have no health benefits for chickens who refuse to eat them"  : )


Sunburned but she won't let us get anything on her to help


Did manage to gather a couple eggs for our effort, and finally managed a bit of a smile from Hannah. 


Hannah's been shyer about smiling since she's missing so many teeth.
I think it's cute and assure her they'll be back in soon.


Thursday, August 30, 2012

Sudden Change


As I've stated in many recent posts it's been hot!! This afternoon the clouds moved in, a wild wind
whipped up that created a huge dust cloud near the lake.  Then the thunder and lightening started,
and was soon followed by a deluge of rain.

You can see how heavy it is in this shot

Initially we enjoyed it coming down out front


It didn't just sprinkle, or rain a bit.  The sky seemed to open up and dump.  We were glad for the rain and the almost 10 degree immediate temperature drop we experienced, but the heavyness of the rain
created a problem as we haven't put the gutters up on the new roof over the back room addition.  It's
sitting out back waiting to go up when the stucco is done, which should happen this weekend.  So without the gutter it dumped a ton of water right by the house and wasn't draining away fast enough.
Especially, because we still had some building supplies blocking the flow and we suddenly had a threat of flooding in the back room. 

Too much  water too quickly!

Poor guys got soaked


Kevin and Cameron had to get out and move quickly to clear a path for the water to drain and add rock to block its ability to approach the entry door.  They managed to get this done and avoid a real mess. My heros !! 

So right after stuccos done gutters must go up!!   Considering the crazy and really bad weather in other parts of the country I really don't have anything to complain about.  This just added a bit of excitement to the day.

Had originally planned a boring post about seedlings I've started in the greenhouse to add to my garden.  Will save that for another day : )


Tuesday, August 28, 2012

Crock Pot Roast


Amber and Eddie ( my oldest daughter and her husband) are coming over for dinner tonight.
So I wanted something I could have done and waiting when they arrive without alot of extra busyness in the kitchen.  I also wanted something I could start and not have to spend the day in the kitchen and take away from our school time. So, I pulled out a tried and true recipe for crock pot roast.  It can be found at this link, To Die For Crock Pot Roast.

I have served this several times each with wonderful results.  The nice thing is you can use a relatively inexpensive cut of beef and because of the long, slow cooking and ingredients, it comes
out tender and so flavorful.

The basic recipe is this:

1 (4-5lb) beef roast, any kind
1 (1 1/4 oz.) pkg. brown gravy mix
1 (1 1/4 oz.) pkg. dried Italian salad dressing mix.
1 ( 1 1/4 oz.) pkg. ranch dressing mix dry
1/2 cup water

Directions:
1. Place beef roast in crock pot.
2. Mix dry mixes together in a bowl and sprinkle over roast.
3. Pour water over roast.
4. Cook on low for 7-9 hours.

Couldn't be easier!!

Oh, I didn't have the packages this time of the dressings so I made my own mixes to use and store.

Ranch Dressing Dry Mix

1/4 cup powdered buttermilk
3 Tblsp. dried minced onions
3 Tblsp. minced dried parsley
1 Tblsp. dried minced chives
1 tsp. salt
1 tsp. garlic powder
1/2 tsp. celery seed
1/2 tsp. ground black pepper

In a bowl or jar (which you can cover) - combine all ingredients. Mix well and store.
Makes about 3/4 cups mix and is enough to prepare 8 cups of dressing.

For this recipe the 1 1/4 oz. = 2 1/2 Tblsp.

To use for regular ranch dressing combine 1 1/2 Tblsp of mix to 1/2 cup milk and 1/2 cup mayonnaise.  Whisk until completely mixed, chill and serve.

Italian Dressing Dry Mix

1 1/2 tsp. garlic powder
1 Tblsp. onion powder
2 Tblsp. ground oregano
1 Tblsp. dried parsley
1 Tblsp. granulated sugar
2 Tblsp salt (adjust to taste)
1 tsp. black pepper
1 tsp. ground basil
1/4 tsp. ground thyme
1/2 tsp. dried celery flakes

Mix together and store in airtight container
To prepare: 2 Tblsp. mix, 1/4 cup vinegar, 2 Tblsp. water and 1/2 to
2/3 cups of olive or canola oil.  Mix well and serve.


Monday, August 27, 2012

Finding a Peaceful Place

Switzerland 1 of  "10 most peaceful places on earth" listed at their travel site

I seriously thought about titling this post "AARGH!!!"  I think every homeschooling parent has had this experience.   I love taking a summer break, but despite my best efforts to plan for review time to ease our way back into school I am always amazed at how many skills aquired last year have just been data dumped during our down time.

It leads to frustration for both the kids and definately for teacher, aka mom.  Planned progress gets set aside as a whole time now needs to be devoted to review and in some cases moving several steps back to recover lessons previously taught, but not remembered at all.  Actually if I think of all the things I've learned over a lifetime, but would be hardpressed to have to perform accurately now I shouldn't be surprised.  Still, it's easy to find yourself frustrated and so I gave myself a "time out" to
find a peaceful place so I stay calm as we learn : )

I typed into my computer "peaceful places" and found beautiful travel images or some that artists and photographers shared as their ideas.

Costa Rica

Tom Kretch Peaceful Photos Collection

Tom Kretch


Then I allowed myself the daydream of what I'll do to relax and recharge when we've made it through these lessons.
Garden


Spend time crafting


Read a good book


Schedules can be altered and adjusted to allow for these set backs right?  After all isn't this a benefit for homeschooling, to be able to personalize the subjects to cover the areas that each student is both strong or weaker in?  To take the time to master each so that a strong foundation is there to build on for future advancement.  Okay, now that mom is mentally recharged on with the school lessons!!

So how about it, am I alone or do other homeschoolers feel this way?

Saturday, August 25, 2012

A Study in Contrasts

This weeks "cooler temperature" forecast.

These past few weeks have been really hot.  I'd posted awhile back how happy we were to get our new house air conditioner installed and have one up and running again.  The daily temps of 106 had us just melting.

Speaking of melting this is what's left of my 3 wick candle I had in the front sunroom. : (


Poor candle!!


The forecasters are calling for lower temperatures, but they've been wrong before.  This morning it was overcast so I took a stroll around the front yard to survey the damage.  The contrast I've listed is between plants that the heat, despite extra watering, are showing the damage of the intense sun and those that not only survive, but thrive in this.


This poor plant needs to be move so I don't lose it

The Angels Trumpet is fine close to the ground but fried on top

The fern is struggling her while the canna loves the heat
Water line was clogged and this oleander is a gonner


The bouganvilla and spanish lavender LOVE this heat!
My Mission fig is producing like crazy


Wisteria needs ANOTHER trim
 
 My Jungle:  Whole areas of the yard where the trees are established and offer shade I have plants that have just gone wild in their growth.  They will need to really be cleaned up and cut back when the temperatures cool this Fall.


My paths are disappearing in the overgrowth


The Breath of Heaven under the Jacaranda is unbelieveable!

So there we have the contrasts of my hardy heat lovers vs. my still hardy yet more temperature sensitive plants.  This Fall I think I'll make a lot of changes to be able to really cut back on water usage next Summer. I'll do this by eliminating or strategically placing the more delicate plants. Then cutting back and heavily mulching those that fair well so they look better, are healthier and can make do with less water.  Aw, another project for the "to do list"!!


Thursday, August 23, 2012

Spreadable Butter


I know that seems a very strange title and subject, but for a family that uses butter as much as we do
it became a much needed item in the kitchen.  We don't use margarine and haven't for years, but butter has it's drawbacks when you want to spread it on bread and it's just came out of the refrigerator or worse the freezer because the person before you used up the last of the butter and neglected to get another stick out - these individuals will remain nameless at least at this time  : )

We have for some time had a container that held our stick of butter and sat ready to use on the counter.  We've never had a problem with it going rancid as it just plain gets used up too quickly!!Recently though with the heat, despite air conditioning and fans we have had an issue with it melting. I just hate keeping it in the frig and having a lump of butter that tears up your bread or won't spread on your bagel.   I know if this is all I have to complain about I'm doing pretty well!!

So, I decided to try the spreadable butters I see advertised.  While at the market a couple weeks ago I wandered the dairy isle and compared the brands and prices in relation to butter.  I wasn't thrilled that an 8oz. cup of spreadable butter ran as much as a pound of butter.  SOOO, on taking a closer look at the ingredients I decided I should be able to come up with my own, right?

Did some research and found blends that used oil alone, oil and water, or creamier sweeter ones with evaporated milk.  I decided for our needs now I'd use the combo I read on the prepackaged store ones.

Here it is:

SPREADABLE BUTTER

2 Sticks softened butter
1/2 cup Canola Oil
1/4 cup water
1/4 tsp salt

In mixer use your whisk to whip butter, then slowly add oil, water and salt.
Whip on high until smooth and creamy. Pour in storage container and refrigerate.

That's it!!

Ingredients

Blending Process

Final Product


The results have been great, the family likes it.  I can keep a container in the fridge and for those interested in the frugal side of this here's my numbers for store comparison.

Costco butter 3 pack  $7.99-  Divided by 3 that's $2.66 a pound.  This calls for half of that so $1.33
Costco Canola oil $9.25- 5 quarts. That's 160 oz and makes it .06 cents an ounce.  For our 2 oz. .12
Water and salt are negligible so total cost for recipe. $1.43.  Since I had the mixer and ingredients out I went ahead and doubled the amount for our use.  So 1 pound of this spreadable butter is $2.86.
With sales and coupons you might do better with a store brand, but in a pinch this isn't bad!!

Tuesday, August 21, 2012

What a Difference a Year Makes


As the title states this last year for Lauren has seen huge changes in her abilities and health. When we began school last year it was very clear she did not have the skill sets listed in her profile and was way behind in basic abilities for her age.   I had purchased Preschool books for her to trace letters and given her a pencil to do this with.  She had no ability to hold the pencil let alone trace the letters. 

So we quickly regrouped and gave her a crayon and I downloaded single lines to trace from online resources.  Over time we added to the number of pages she would trace, changed the direction of the lines and then moved to U's, V's, O's and squares.  As she progressed and was comfortable with holding a crayon to draw we switched it out for a pencil and started back with initial lines and moved forward to the following letter and shape skill sets.  Ultimately, the year ended with her ability to write and know all her letters and her numbers through 20.  This was major progress for her.  We were also having to deal with her ability to do her work without purposely creating trouble for herself or messing up. Lauren had to learn to deal with her own ability to control herself and channel her energy into positive activities instead of the negatives she had such a propensity to operate in.  She learned that she could make good choices for herself instead of giving in to negative behaviors for attention.  It was a trying year for all of us, but the results are really on display this year as she is excited about her new found abilities and about learning.

Last week I posted that I had brought out our well used copy of the phonics program Sing, Spell, Read and Write.  To familiarize her with this we just spent time each day watching and listening to the introductory phonics song on the video.  This week begins the lessons and she was so excited about this as she proudly announced to Kevin when he got home yesterday "I'm learning to read!!"

Her phonics lesson included tracing then writing a page of capital and small A's, then naming the pictures with the a as in apple sounds.  Next she had to cut these out, which was more than a little challenging to coordinate the scissors.  Finally pasting them in place then on to her phonics teaching video as she traced in the air the letters being drawn and pronounced. She enthusiastically repeated after the teacher the letter sounds and then sang the phonics song.  Lauren was really pleased with herself by the end of her time and wanted to do more work!!

Learning to use scissors

Making progress!

Gluing appropriate pictures for the a sound

Air tracing letter shapes along with video teacher

a,a,a, apple, b,b,b ball... singing with phonics video


Lauren's phonics lesson for the day


So each day we will keep building on the achievements of the last and introducing more subjects to help her not only catch up with her peers, but excel as her skill sets grow.  Have already been through this with Amber years ago, so I am confident of Lauren's ability to catch up and even exceed age group requirements and educational needs. I think she will surprise herself in what she is able to do.

Cameron has continued to help Hannah with her Bible and Science lessons.  Today they were drawing giraffes to go with the Genesis lesson of Noah's Ark.


They continue to surprise me with the drawings they produce


Saturday, August 18, 2012

Kids Bathroom Done


It's been a work in progress for several posts now and I'm happy to say it's all done!! I'm happy, Kevin's happy and the kids are definately happy to have their bathroom back without all the paint supplies and whatever was being worked on at that point cluttering up the small room.

We began with the room having a darker rose glaze on the walls and more items and decorations in this room.
View from shower area before

View from hallway before

I lightened up the color by painting a cream base then ragging on a lighter taupe color glaze to accent the texture on the walls, but not done as intensely as the first rose glaze was. I sponged more of the cream over the beach glaze to insure the color stayed lighter.

View from hallway after

View from shower area after

Then it was on to the sink, completely changing the look from the dark cabinet and counter to lighter finishes. The tile backsplash was replaced with white PVC board trim for a durable backsplash that again is just brighter.  The faucet was replaced with one that looks better and has the same brushed silver finish that the light fixture has.

Sink before

Kevin adding backsplash


Sink after

The bathroom cabinets over and near the toilet were cleaned and sprayed with a fresh coat of white paint to give them a needed pick me up.

Cabinet over toilet

Small cabinet

Tall cabinet by shower


The shelf with towel hooks was replaced with a simple brushed silver bar and a picture was hung where the shelf had been.

Shelf with towel hooks and other decorative items before

Kevin putting up new towel bar

Towel bar and picture after

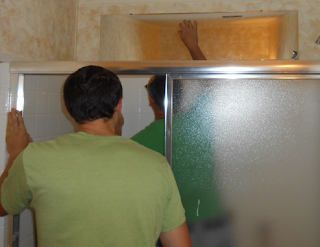
We added a mirror and framed it out over the shower area.  This brightens that end of the bathroom that could be dark and cave like before.  This mirror reflects the light source over the sink and works like I'd hoped to lighten the whole room.

Clips going up

Mirror mastic to back of mirror

And it's up. Just needs the trim

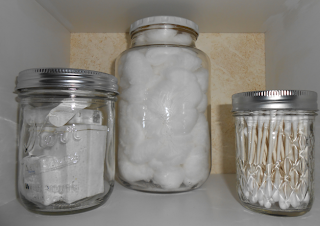
I thinned the number of decorations and made most more practical.  The top shelf of the tall cabinet has jars with cotton balls, dental floss and cotton swabs.  The middle shelf has a few decorative items, at least for now.  An antique shaving cup that holds my grandfathers old straight edge razors and an antique cold cream jar are some of the items in this little vignette.

Top shelf tall cabinet

Vignette

Here it is!


So one more project down, YAY!!!